INTRODUCTION
Human beings are primarily visual animals. 90% of our brand is used for seeing.
Using images in your posts and blog site is essential.
also emotional animales and reasoning animals second. Make choice then justify it – reason it – look for why bought. post purchase rationalisation
They add interest
They provide stopping power to your ads (see Course )
However it can be time consuming and costly to get great images. I do it while watching tv, or when I’m on a bus or train
BUT IT PAYS OFF
Examples
SOME GRAPHICS TERMS AND KNOWLEDGE
Bitmapped (or Rasterized) Graphics
When producing new versions of any graphic, always use the original to make each new version. This will retain as much of the quality as possible. Always ensure that the image mode is on RGB color.
Each time a graphics package shrinks an image, it reduces the number of colors, therefore reducing the quality. So if you use the original every time, you will always get the most colors possible.
Unless the image is a vector image, you can’t create a good quality larger version as there won’t be enough colors to render the image at the same quality.
Once a graphics package, such as Adobe Photoshop or Adobe Fireworks, has optimized the graphic, you cannot get back to the original quality. GIFs are indexed color and JPGs may have their quality reduced to shrink the file size.
There will always be a sacrifice between quality and file size. The smaller file size will result in faster download times.
Resolution
Size affects the quality of the image but also the lead times.
You can optimize your images in WordPress using tools like
that will speed up load times and keep your site efficient.
Graphic Sizes
The optimal sizes for images varie widely depending on the media you are using. You have to be careful that your image are optimized for mobile devices.
Alos you will need to optimize image size for use on all the various social media sites you plane to promote on. Pinteset is different from Instagram, Facebook have different recommendations from Quora and so on.
Optimal Recomeneded Size by Playform
Tools that can help
Canva is a great tool for creating all of your images in the right format, size and resolution fro each platform.
THE DO’S AND DONT’S
Re-sizing Images in a Web Page
Never use the width and height attributes of the < img > tag in the HTML of a web page to resize images. If you use this method to reduce the image size, you will increase the download time of the page as a whole. This is because the browser has to “re-draw” the image at an incorrect size which takes longer.
Avoid using the same technique to increase the size of an image. It severely reduces image quality as well as taking longer to download. Use your favorite graphics software to re-size your images properly and include the correct width and height dimensions for a faster download. The result will be a better-looking website as well as faster download times. Kraken.io and Optimizilla are a few of the free online tools you can use to compress and resize images. Take note: the tools mentioned are not affiliated with Bluehost, you can still research online for other tools that work best for you.
USIng WORDPRESS EDITOR
IMAGES
Using effective images is a great way to create depth, interest and emotion to your posts.
Finding great images
The online libraries – paid and unpaid.
You get what you pay for.
Original is best
If you can use your own images all the better.
Websites
Let’s say you review cafes for your blog. Whilst visiting and taking your own images is best the owner may let them use there website ones. Just ask and get their permission first.
Also visitors often post their own to a gallery on the internet. These are somewhat in the Republic gallery and should be fine to use.
If you are reviewing other websites then the use of their images should be fine also.
Copywrite
Clipping Tools
If you are writing how to posts then it ay be appropriate to use a great many screen clips. There are many tools around and there is the free windows one which is pretty good.
But by far the best one I have used is from a company called Tech Smith and is called “Snagit”. It comes with a built in image editing tool which makes it easy to add blurring, shapes, lines, step numbers, arrows, gifs from a series of images, and much more. I use this tool a great deal.
You can find it here. It is not free and not that cheap but great value if you make how-tos. I love it.
Snagit -> https://www.techsmith.com/screen-capture.html
Note: This is not an affiliate link. I recommend it because I flog it.
GIFs
Your content goes here. Edit or remove this text inline or in the module Content settings. You can also style every aspect of this content in the module Design settings and even apply custom CSS to this text in the module Advanced settings.
VIDEO
Online the amount of video is now huge and has infiltrated every social media platform. The undisputed leading repository of videos on the internet is YouTube. If it is appropriate to your niche to include video then using it in your posts can make them much more valuable to the reader and marketable using YouTube and social media.
Making videos is a vast topic and one you will have to research and pursue with vigor if your blog relies on it.
There are many tools. The one I use is Camtasia from TechSmith. But I know so little about the others that I am not in a position to rate or recommend them over the others.
Some of the other big ones include:
Adobe
PRODUCTION TOOLS
The big guns include:
AI’s
These can turn your written words into fully-fledged videos in minutes.
METHODS AND TECHNIQUES
Backgrounds and opacity for headings
Cropping for effect

Your content goes here. Edit or remove this text inline or in the module Content settings. You can also style every aspect of this content in the module Design settings and even apply custom CSS to this text in the module Advanced settings.

SEO your images
IMAGE STOCK PROVIDERS
For many bloggers including images on your posts is essential. They create a lot more life and interest, are easier and more entertaining to read and are ranked higher by Google.
However high-quality images can be an expensive overhead, especially if you are just beginning. There exists a uber of free providers that can be a real boon to bloggers. Once you get started and the money begins to flow then you can begin to consider the paid sites that have a huge resource of highly professional photos and videos.
Free providers
Wikimedia Commons: https://commons.wikimedia.org/
This is a great site containing millions of images, sounds, and videos that can be used for free provided you include the appropriate attribution. Search the site, find the picture you need, use it and attribute it. It’s a huge source.
One slight negative of the site is that the images are not all of the high quality as you would expect from a professional paid site. But the range is huge and free.
Here is an example of how to use the image appropriately. You must include the author, the license details as links and whether or not the photo was altered, so cropped, filtered etc.
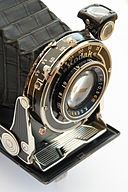
Photo by Kolossos on Wikimedia Commons
Pixels: https://www.pexels.com/
Pixabay: https://pixabay.com/
Unsplash: https://unsplash.com/
PngTree: https://pngtree.com/
AllTheFreeStock: https://allthefreestock.com/
This one contains all the free stock libraries in one place
Freepik: https://www.freepik.com/
Paid Providers
iStock:
Alamy: https://www.alamy.com/
Do this now!
Write down, or type into your post, the topic heading in capital letters at the top of the page.
This may change after the next two sections but get started.
Do this now!
Write down, or type into your post, the topic heading in capital letters at the top of the page.
This may change after the next two sections but get started.