BUILD YOUR ONLINE STORE
INTRODUCTION
Lorem Ipsum is simply dummy text of the printing and typesetting industry. Lorem Ipsum has been the industry’s standard dummy text ever since the 1500s, when an unknown printer took a galley of type and scrambled it to make a type specimen book. It has survived not only five centuries, but also the leap into electronic
WORDPRESS OR SHOPIFY
[SEE ARTICLE IN WORD DIRECTORY]
ALL IN ONE ON LINE STORES
Shopify
Gumroad
Podia
Sellfy
Payhip
SendOwl
SamCart
WORDPRESS AND WOO COMMERCE
There are essentially two options you can choose to build your online store in. These are WooComerce, which is a WordPress add-in, or Shopify, which is an all in one website and store in one.
the o you choose may be determined by the current position you are in. If you already have a WordPress website and are looking to adding a store to it then WooCommerce is probably the way to go. If you are starting from scratch then maybe Shopify is for you. Either way, both platforms are powerful and will provide you with a fully functional online store.
In the following sections, I review both options.
SET UP IN WP WooCommerce
There are xxx steps to setting up your store in WooCommerce. They are:
Step 1. Add WooCommerce to your website
WooCommerce is a plugin for WordPress. To install it click on the Plugins heading in the right pane of WordPress and search WooCommerce in the search textbox. In the top left corner of the Add Plugins screen press “Add New”.

Click on the “Add New” button in the WooCommerce box and then on the “Activate” button. You have now added the WooComerce plugin.
You will notice two new headings in the left-hand menu bar. They are:
The first time you click on the WooCommerce link shown above the quick setup wizard will run. The wizard will step you through the store details process of the setup process.
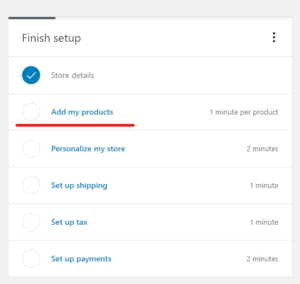
It is detailed below. Once complete the WooCommerce home page will contain the following menu of thing you need to complete to have an operational store setup. It looks like this.

Step 2. Run the setup wizard to enter your store details
1. Store Details

2. Industry

3. Product Types

4. Business Details

5. Theme
This is the WordPress look and feels that you want to adopt for your store. You can pay for an expensive storefront now but I think it is best to go for the free one to start with and then explore more fully the vast array of storefront designs that you can buy later. So for now just stick with the free “Storefront”.
You will be making a lot of design changes to it latter anyway with images and products so that it will look like your store.

Once complete the WooCommerce home page will contain the following menu of thing you need to complete to have an operational store setup. It looks like this.
Let’s step through the rest of the process now.
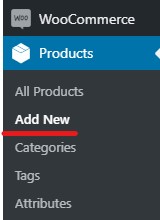
Step 3 – Add your products
Now we need to add your products to the store. Click on the “dd my products” link.
Note that this is the same as selecting the “Add new” link from the “Products” menu item.
This process will allow you to add your products one at a time. There is a more powerful option allowing you to add your products from a csv file. This method is described later in this course (here).
At the “Add new product” screen start by giving your product a name a description and assigning it to a category.

Now move down the page and select the “Simple product” option from the dropdown menu then add the “Regular price” and the “Sale price”. You can turn the sale price on and off as you want. We will discuss this in more detail in the “Advanced WooCommerce” course.

Your content goes here. Edit or remove this text inline or in the module Content settings. You can also style every aspect of this content in the module Design settings and even apply custom CSS to this text in the module Advanced settings.

Your content goes here. Edit or remove this text inline or in the module Content settings. You can also style every aspect of this content in the module Design settings and even apply custom CSS to this text in the module Advanced settings.

Your content goes here. Edit or remove this text inline or in the module Content settings. You can also style every aspect of this content in the module Design settings and even apply custom CSS to this text in the module Advanced settings.

Your content goes here. Edit or remove this text inline or in the module Content settings. You can also style every aspect of this content in the module Design settings and even apply custom CSS to this text in the module Advanced settings.

Your content goes here. Edit or remove this text inline or in the module Content settings. You can also style every aspect of this content in the module Design settings and even apply custom CSS to this text in the module Advanced settings.

Your content goes here. Edit or remove this text inline or in the module Content settings. You can also style every aspect of this content in the module Design settings and even apply custom CSS to this text in the module Advanced settings.

Thats all it takes to get your store set up in WooCommerce. However that does not mean that your ready to go yet. Your site now needs to be customized and arranged to look like a store and a large part of that is done with the customize feature of WordPress.
To see how to do this go to the Customize section of the WordPress course and we will step through the process there.

Step 4 – Customize your site
Your site is up and running now but it looks pretty ugly. So now it is time to turn it into a reasonable looking store.
There are things that I like in design that maybe you don’t so you will have to be the judge here. If you like something that I don’t just ignore me and go with your preference. I am a bit of a zen minimalist – I like to keep things simple and I suspect the shopper prefers this too. Nowadays there can be so much going on on the screen that it can be extremely annoying and detrimental to how successful you will be.
Anyway – design is a personnel thing so explore to your heart’s content but here is how I set up my stores.
Note: We will not be touching the PHP files in this course – that is a more advanced method and can potentially break your site.
a) Use the “Storefront” free theme.
Paid version
a. remove the breadcrumbs
This is the easiest and safest way to remove WooCommerce breadcrums. You don’t need to enter PHP code, thus minimize your risk of breaking your own site.
Most of the time, your breadcrumbs has this CSS class: woocommerce-breadcrumb.
So, in order to hide it, you will enter this block of code inside: Appearance->Customize->Additional CSS
Publish the change and you should see the breadcrumb is gone.
Remove the page titles
Remove the right sidebar (sacrilege I hear you scream – totally up to you.
b) Use the “Storefront” paid theme.
Paid version
c) Use Your Favorite Theme
You can use any theme you like – maybe one you know really well already and just add the 4 essential pages of a store using the WooCommerce shortcodes.
[woocommerce_cart] – shows the cart page
[woocommerce_checkout] – shows the checkout page
[woocommerce_my_account] – shows the user account page
[woocommerce_order_tracking] – shows the order tracking form[products] – controls and displays your products
For a full explanation of WooCommerce shortcodes visit their website HERE.
d) Use My Favorite Theme – Divi
Divi is an extremely powerful website building platform and theme that I just love. It gives me amazing flexibility and power and now has a WooCommerce formatting section so you get even more control. Plus it comes with all the usual Dive features that superpower your creativity like Divi scroll effects which enable you to highlight key products or special, feature promotions and many other opportunities for marketing your shop. *
(* This is not an affiliate site. I recommend products because I use them)
SET UP IN SHOPIFY
Your content goes here. Edit or remove this text inline or in the module Content settings. You can also style every aspect of this content in the module Design settings and even apply custom CSS to this text in the module Advanced settings.
GETTING SETUP
Lorem Ipsum is simply dummy text of the printing and typesetting industry. Lorem Ipsum has been the industry’s standard dummy text ever since the 1500s, when an unknown printer took a galley of type and scrambled it to make a type specimen book. It has survived not only five centuries, but also the leap into electronic
CHAPTER 2
Lorem Ipsum is simply dummy text of the printing and typesetting industry. Lorem Ipsum has been the industry’s standard dummy text ever since the 1500s, when an unknown printer took a galley of type and scrambled it to make a type specimen book. It has survived not only five centuries, but also the leap into electronic